
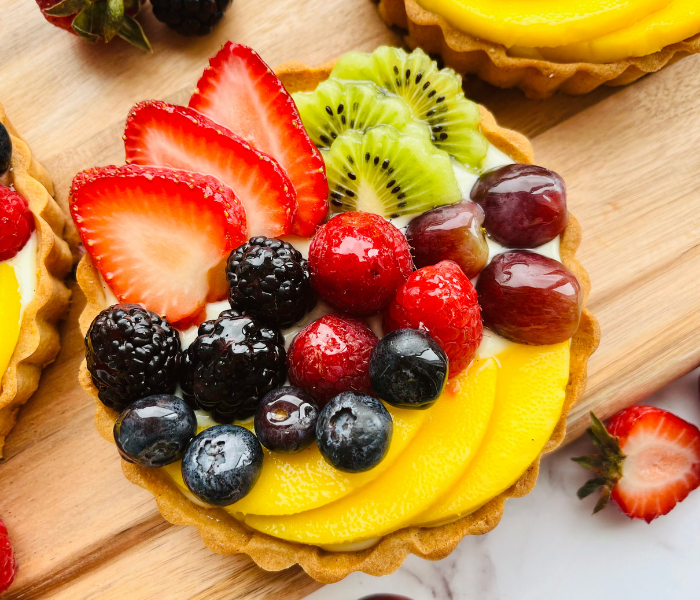
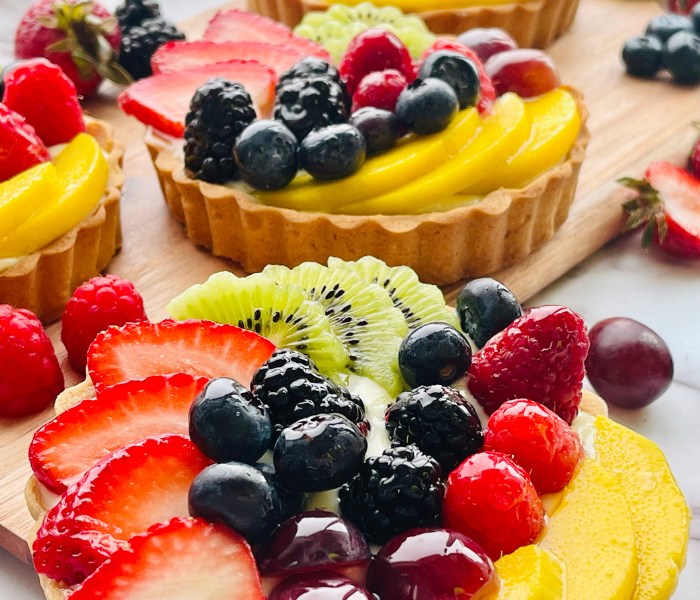
Classic French Fruit Tart
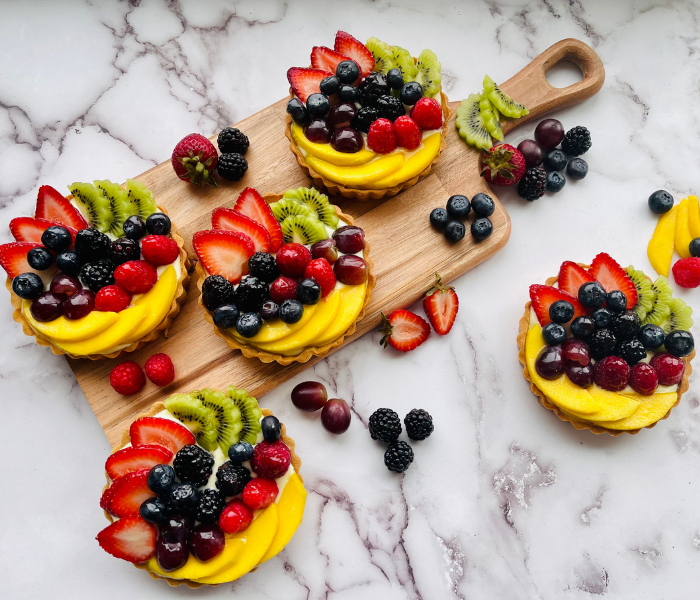
This Classic French Fruit Tart has a rich, silk & smooth pastry cream, is loaded with colorful, fresh summer fruit, and has the best crunchy shortbread crust! There is nothing quite as lovely as this beautiful, fresh dessert!
It has been a few weeks since my last blog post. I was busy packing up our house and moving. We made it to the desert, and I am not thrilled about it because I love the mountains, the cold, and the snow. Winter is my favorite time of the year!
Nevertheless, we have finally settled in enough that I find some time here and there to create and write.

This Classic French Fruit Tart is a hit with my kids!! Not only do they like the colorful look of it, but they love the taste. If the kids approve, I know it’s blog worthy 😉.
The pastry cream might sound a little challenging if you have never made one before, but I added some helpful tips later in this blog post to help you succeed!
The best tart crust to use for the base
I have made these Fruit Tarts with many different tart crusts to see which combination tastes the best. The one with the shortbread crust is hands down, our favorite. The shortbread adds such a nice, buttery flavor to the tart. Plus, it is really easy to bake and keeps its shape beautifully.
It goes so well with the Créme Pâtisserie and the juicy fruits.

Helpful tips for making Crème Pâtisserie (also called Pastry Cream or Crème Pât)
Temper the eggs: To prevent the cold ingredients from cooking too quickly or too much, you have to temper the eggs with warm milk. You only add some of the warm milk to the egg yolks to gradually raise the temperature of a colder ingredient (in this recipe, the eggs). If you add all of the hot liquid into the eggs at once, you will end up with scrambled eggs in your pastry cream. Once you have tempered the egg yolks, you can add them to the pot of hot milk and whisk very well.
Watch the foam: Since you are constantly whisking, a lot of foam will form on top of the pastry cream. This foam will slowly start to disappear as the cream cooks. It signifies that the cream has begun to thicken and will be ready shortly.

[Disclosure: This page contains affiliate links. If you take action (i.e., make a purchase) after clicking on one of the links, I’ll earn some tea money, which I promise to drink while creating new content for you 🥰. You do not pay a higher price!]
Whisking, whisking, whisking: Never stop whisking!!! It is crucial to achieving a silky smooth pastry cream. In addition, the whisking prevents the cream from sticking to the bottom of the pot and becoming overcooked and lumpy.
Cool the cream to room temperature: You want to wait to add the butter to the pastry cream until it is just about room temperature or slightly above. If you add the butter to the hot cream right after it’s done, the cream will get grainy and greasy because the heat will break down the butter emulsion.
But if you wait, you will have a smooth, velvety light pastry cream.
Wrap tightly to store: Once the pastry cream is finished, press the plastic wrap against the surface of the cream and remove all air bubbles so that it does not form a “skin” or firm layer on top because you want a pastry cream with a smooth texture.

Common mistakes when making Crème Pâtissèrie
The cream is lumpy: This happens if the pastry cream gets heated at too high of a temperature or doesn’t get stirred well enough. That doesn’t mean your cream is a goner; just whisk it really well to get rid of the lumps. If that doesn’t work, sieve it when the cream is still warm.
The cream is too thick or thin: If it is too thick, you may have added too much cornstarch to the recipe. This can happen if you accidentally used the wrong measuring spoon or the corn starch didn’t get leveled in the spoon. You can add some heavy cream to make it the right consistency.
If it is too thin, it either wasn’t cooked properly or long enough, or you didn’t use enough cornstarch. In a separate bowl, mix a little bit of cornstarch (1 tbsp is usually enough) with a splash of milk. Then add it to the cream away from the heat. Whisk really well to combine, then place it back on the stove and keep whisking until the cream thickens. Repeat if needed.
Choose fresh fruit!!
My last tip: Choose fresh and ripe fruit that is in season! Frozen or canned fruit doesn’t work well for this tart. You will end up with a runny mess that doesn’t taste nearly as good as the one made with fresh fruit.
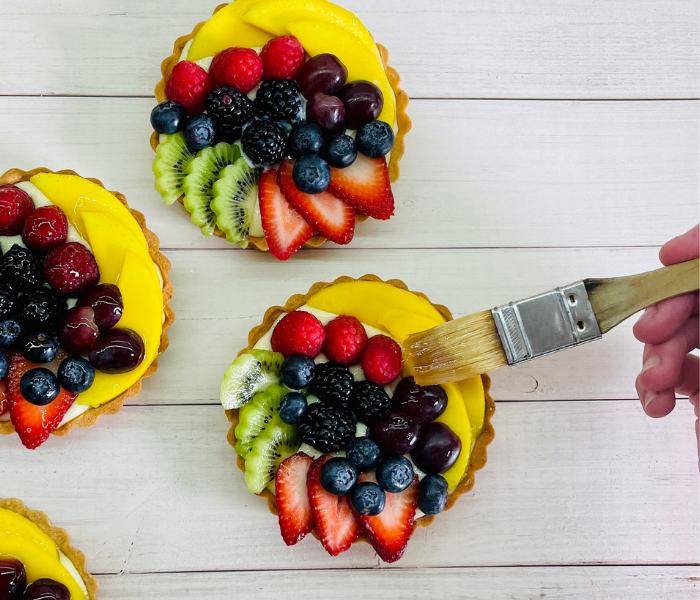
Glaze them with a yummy jelly, and you will have the most delicious fruit tarts!
E Guete (Bon appétit)!! Don’t forget to share some pictures with me and tell me how you liked this Classic French Fruit Tart. It would make my day if you tag @mirjamskitchenyodel on Instagram, share on Facebook or pin on Pinterest.
You might also like:
Strawberry Cream Cheese Danish

Classic French Fruit Tart


Ingredients
For the Tart Shells
- Shortbread crust recipe here
For the Pastry Cream
- 530 g Whole milk
- 130 g Granulated sugar
- 9 egg yolks
- 40 g Cornstarch
- 100 g Butter unsalted cubed and softened
For the Fruit Glaze
- 100 g Apple jelly or any clear jelly recipe here
- 2 tbsp Water
- Assorted fresh fruit for decoration

Instructions
Tart shell:
- Prepare the shortbread crust according to my recipe. Then let it rest for at least two to four hours or overnight!
- Butter the tart rings!
- Once the shortbread dough is chilled, roll out the dough to about 1/8 (3-4mm) thick with a rolling pin. Make sure you work fast, so the dough doesn’t get too warm and hard to work with.
- Using the tart rings as a guide, cut circles from the dough sheet that are 1inch (2,5cm) wider than the outside of the ring. That way, the dough round will be big enough to come up the sides of the ring.
- Carefully take the dough round and place it on top of the tart ring. Push down gently with your fingers and press the dough along the inside of the ring, making sure to get into all the inside edges. It is crucial not to press too hard to keep the tart shell an even thickness; otherwise, it will bake unevenly.
- Use a sharp knife and cut off the excess dough that is hanging over the edge of the ring.
- Place the tart rings back in the refrigerator for about 30 minutes. Chilling the dough will prevent the shells from shrinking in the oven.

- Preheat the oven to 350°F or 180°C.
- You want to blind-bake the tart shells to assure you will have a nice and even end product. Take the tart rings out of the refrigerator and line them with parchment paper so that the entire surface of the dough is covered. Then fill them with rice or beans to hold down as weight.
- Place the rings on a baking sheet and blind bake them for about 15-20 minutes until you see them starting to get a light golden color. Then take them out of the oven and remove the parchment paper with the rice or beans. Then put the rings back in the oven and bake for another 8-10 minutes until the shell is a light golden brown.
- Unmold after 10 minutes, place the shells on a cooling rack and let cool completely.
Pastry cream:
- Bring the milk and half the sugar to a boil in a medium-sized pot. Whisk frequently to prevent the milk from burning to the bottom of the pot.
- Whisk the other half of the sugar with the egg yolks in a medium-sized mixing bowl. Make sure you whisk immediately to prevent the eggs from clumping up with the sugar called “burning”). Then mix in the cornstarch until smooth.
- Add about 1/2 cup of the warm milk to the sugar egg mixture and stir until combined.
- Place the whisk into the pot with the hot milk and while whisking, pour the egg mixture into the milk. On medium heat, heat the mixture until it noticeably starts to thicken. You must stir constantly!!! It takes about 3-5 minutes for the mixture to thicken. Be aware that the cream will continue to thicken as it cools. So make sure you remove it before too much liquid evaporates. Once the foam starts to disappear, you will know that the custard is almost finished.

- Remove from the heat and let it cool to room temperature. Whisk occasionally to prevent a skin from forming. Once at room temperature or slightly above, add the cubed butter until combined. The pastry cream will be smooth with a glossy texture.
- If you see lumps in your pastry cream, strain it through a fine sieve to help remove them.
- Cover with plastic wrap. It’s important to press the wrap up against the pastry cream so that no air gets to it to prevent skin from forming.
- Refrigerate until thoroughly cooled or for up to three days.
Assemble:
- Wash and peel (if needed) the fruit and cut them into the desired shape and thickness.
- Take the pastry cream out of the refrigerator and whisk it well. It will be thicker in consistency now, but the perfect consistency for piping.
- Fill the pastry cream into a pastry piping bag and pipe the pastry cream in a spiral pattern evenly into the tart shell.
- Arrange the fruit in a decorative pattern.
- Make the clear fruit glaze by warming up the jelly with the water in a small saucepan. You might need more or less water. It shouldn’t be too runny for it to stick to the fruit nor too thick that you can’t brush it on.
- Once you have the right consistency, carefully brush the warm glaze over each fruit. Starting from the inside and working your way out, leaving a thin layer on each fruit. This step isn’t a must, but it gives the fruit a shiny, fresh look; and prevents it from browning.
